Time for installing package bees in my new hive.
If you’re beginning beekeeping, package bees are a great way to stock your first hive.
And installing them is easy, as you’ll see.
Be Prepared!
If you’re beginning beekeeping and just starting your first hive, having everything that you’ll need on-hand and ready will make the process of installing package bees much easier and less stressful.
That begins, of course, with building your hive, and having a location selected and prepared before your bees arrive.
Locating The Hive
What makes for a good hive location?
That will vary somewhat depending upon your geographic location.
Here in Texas, I like to have my hives in partial shade when possible. The location I’ve selected will be heavily shaded during summer, but will receive a fair amount of sun in the winter after the deciduous trees shed their leaves.
Face Entrance Southerly
It’s generally recommended that the hive entrance face a southerly direction (in North America, anyway). It’s said that bees will be more productive when facing south because the sun will hit the entrance earlier, and so the bees will begin working earlier.
I’m not sure that I buy that, but having your bees facing south will reduce the amount of cold air blowing into the entrance when the blue Northers of winter blow through.
But I wouldn’t worry a whole lot about which direction your hive is facing.
Downward Slope
It is important, though, to set up the hive so that there’s a bit of downward slope from back to front. That’s so rainwater won’t run in the entrance and pool on the bottom board.
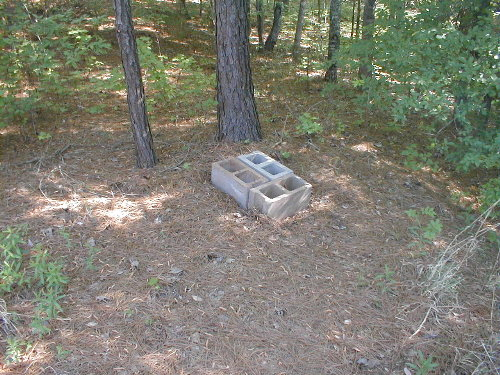
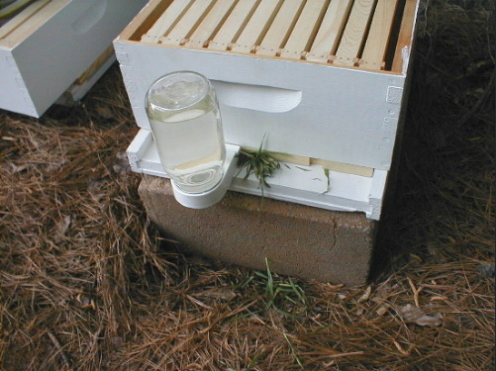
I also prefer to elevate the hive off the ground. Cinder blocks make for a wonderfully inexpensive, durable and stable hive stand.
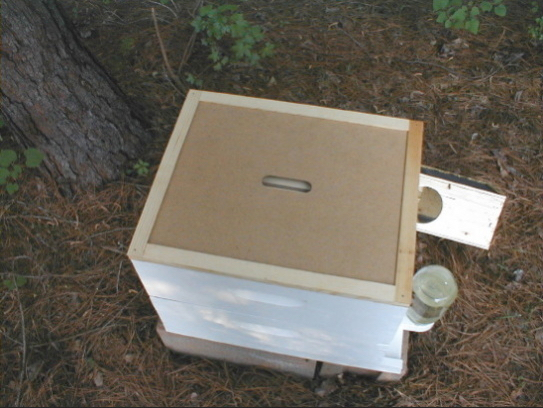
Setting-Up the Hive
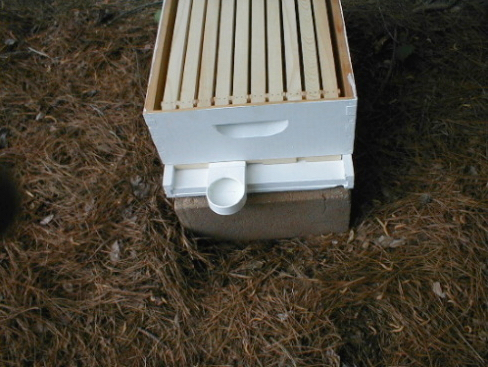
I’ll go ahead and set up the bottom board and bottom hive body with the entrance reducer and feeder in place.
I’ll also stuff some grass into the entrance. The plugged entrance will keep the bees in the hive while they settle down, but only temporarily.
As the grass begins to dry, the bees will pull it out of the entrance. They’ll probably have the entrance clear before mid-morning tomorrow. If not, I’ll unplug the entrance at that time.
The plugged entrance will also serve to keep out bees from other hives.
Guard Bees
Normally a strong hive has guard bees posted and ready to repel any unwelcome intruders. But for a while, my new hive will be weak, unorganized and vulnerable.
So the plugged entrance will give them time to organize. And the entrance reducer will reduce the amount of territory that the guard bees will have to patrol.
The entrance reducer will be removed after the hive has gained strength, and before the weather gets really hot.
Since I’m using 2 medium depth bodies instead of one deep, I’m going to pull out the middle 6 frames from the second hive body.
If I were using one deep (the more traditional configuration) I’d pull out 4 frames.

Time to Move In the Bees
The time has finally come to start my new bee hive!
These are the things I’ll want to have on hand:
- My trusty hive tool
- My bee veil (and you might also want to have gloves and a bee suit)
- The hand sprayer containing sugar syrup
- A toothpick or small diameter nail
Installing package bees is the ONLY time I ever work bees without a bee smoker.
OK, let’s get started.
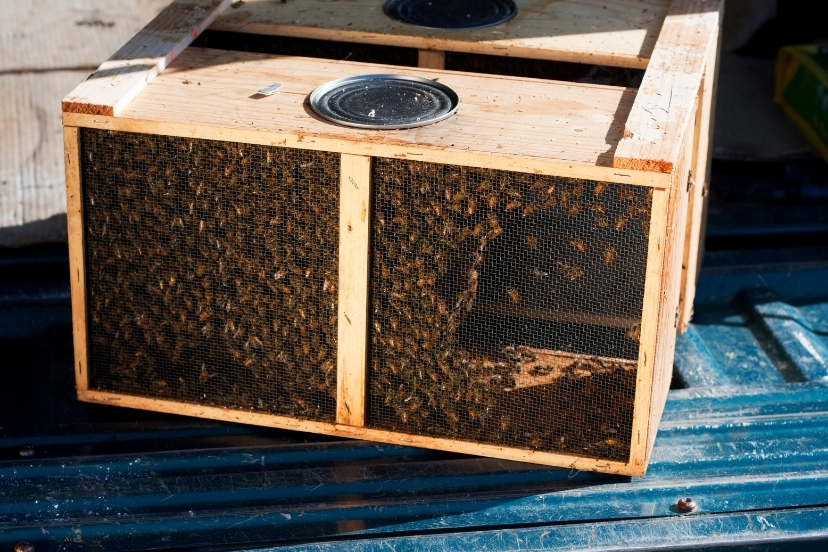
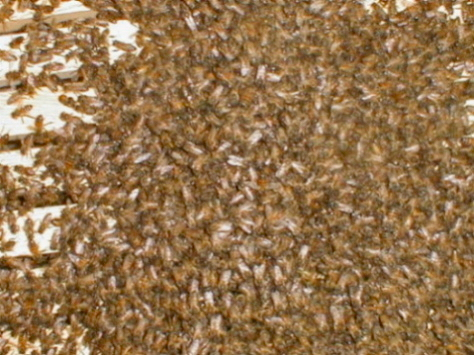
First, I’ll thoroughly spray the bees with sugar syrup. This will help calm them and keep most of them from flying.
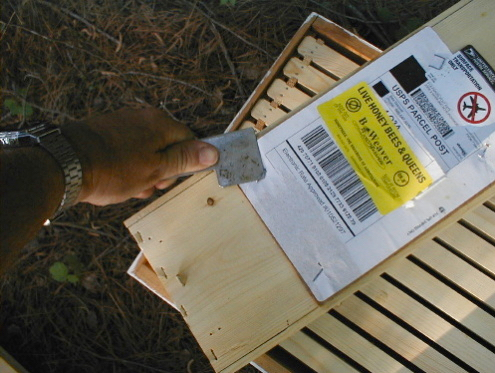
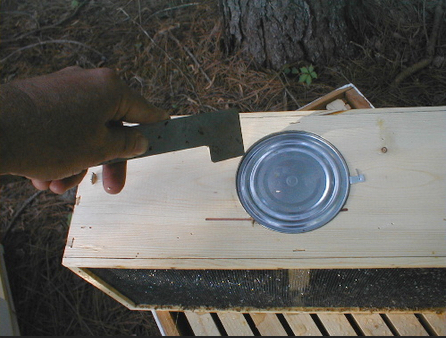
Then I’ll pry loose the staples holding the cardboard cover over the feeder can. I’ll keep that cardboard cover handy, though; I’m not through with it.
Once the cover is loose, I’ll give the package a couple of jolts to bump the bees to the bottom of the package.
Then I’ll take out the feed can and set it aside.
I’ll also give a few more squirts of sugar syrup through the feeder hole (don’t worry about overdoing it with the sugar syrup spray).
Queen Cage
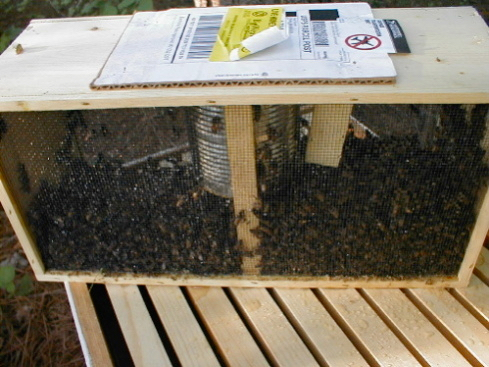
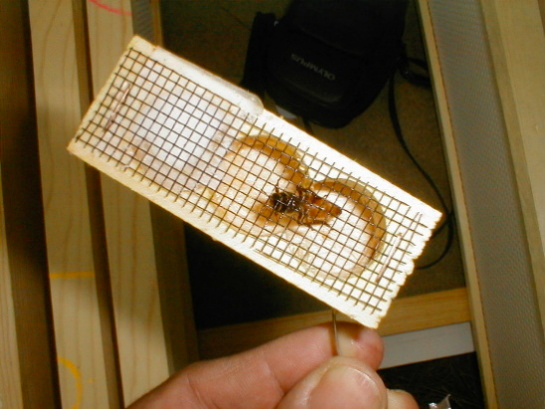
With the feed can out of the package, I have access to the queen cage.
I’ll pry loose the staple attaching the queen cage to the package, remove it, and lay the cardboard cover back over the opening.
This is the time to take a look at the queen to make sure that she’s alive.
(Happily, she is. But if the queen were dead, I’d go ahead and finish hiving the bees, and then immediately call the package bee supplier for a replacement queen.)
I’ll then use my toothpick or nail to pry out the cork plug from the CANDY end of the cage. (There’s a plug on the other end of the cage also, and that one needs to stay in place.)
With the plug out, I’ll poke a small hole through the candy – carefully, though, to be sure I don’t injure the queen.
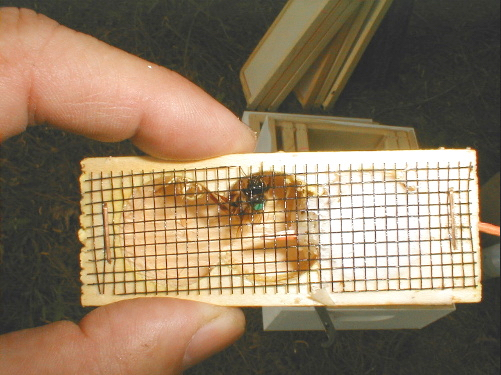
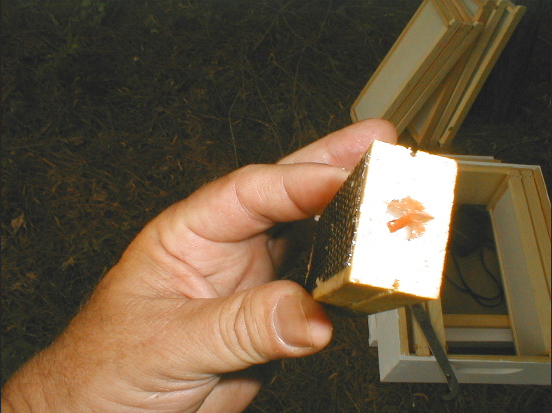
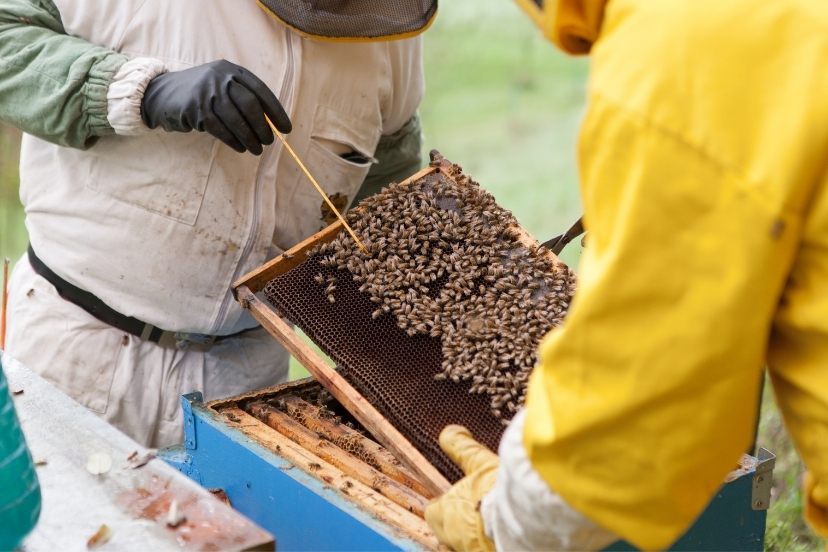
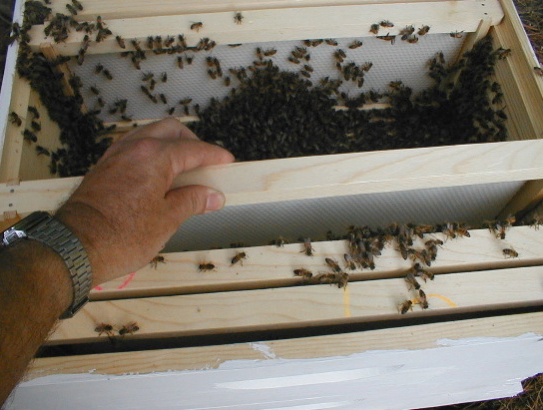
Now I’ll insert the queen cage between frames in the middle of the hive body.
The cage should go in candy end down. And it’s essential that the bees have access to the screened side of the cage.
A thumbtack can be used to secure the cage to the frame using the metal strip that secured it to the package.
And one frame may have to be removed temporarily to make room for the queen cage.
The Queen’s Acceptance
The bees will eat through the candy over the next few days and eventually release the queen.
The reason for not releasing the queen immediately is that she may be unfamiliar to the bees.
Often, the queen and bees in a package come from different colonies. And if a queen is released among bees that do not consider her to ‘be theirs’, she will be killed instantly.
But delaying the queen’s release as the bees eat through the candy plug gives the bees time to accept the queen as their own.
Second Hive Body
Now, after adding the second hive body, I’ll just dump the bees right over the center frames of the lower body.
With a bit of jostling and shaking, almost all of the bees can be removed from the package.
I’ll set the nearly empty package by the entrance, and the few remaining bees will find their way inside once the entrance is cleared.
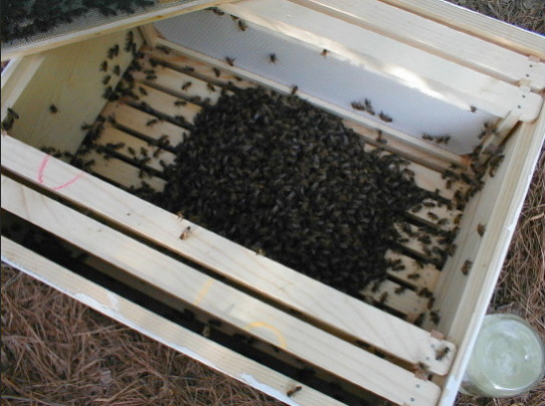
All that’s left now is to replace the empty frames, and close up the hive.
I’ll just set each frame in place on top of the mound of bees below.
As long as I just let the frame rest on the bees, and don’t press down, the bees underneath will move out of the way without being hurt, and let the frame settle into place.
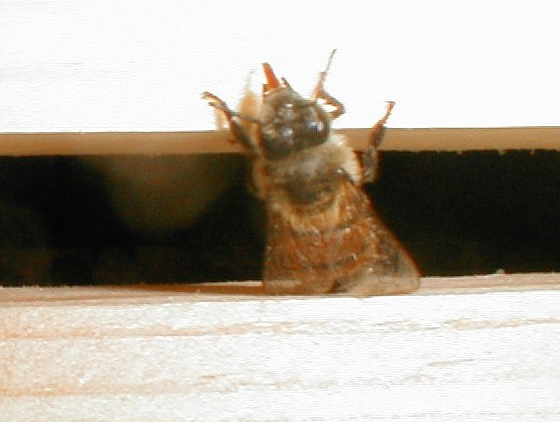
A quick look before closing up the hive reveals one girl already hard at work housekeeping!
She’s busy cleaning up a drop of spilled sugar syrup.
Bees Adapt Quickly
It’s always amazing to me how quickly bees adapt to a new home. All of the thousands of bees somehow take up all of the different jobs necessary to get the hive going.
Whether it’s building comb, cleaning, foraging or guarding, every job of the hive is being done within hours or even minutes of the bees being dumped into their new home.
Could a group of a few thousand humans set to work so quickly and efficiently, somehow deciding (without a leader) who will do what job, without grumbling, complaining and squabbling?
I think not!

The Job Is Done
Well, my bees are hived, and hopefully off to a great start.
I’ll keep an eye on the feeder jar, and refill it when it gets low, but otherwise I’ll leave the bees alone for 6 or 7 days.
Then I’ll check to be sure that the queen is out of her cage. And if all is well, she’ll probably be laying eggs by then.
There Doesn’t Have to be a Whole Lotta Shaking Going On…
If you will be installing package bees for the first time, and you’re a beginning beekeeper, there’s an alternate method of hiving your package that you might prefer.
Though package bees are not normally defensive (I don’t think I’ve ever been stung while hiving a package), the idea of jarring and shaking thousands of bees might be a bit intimidating to a newbie!
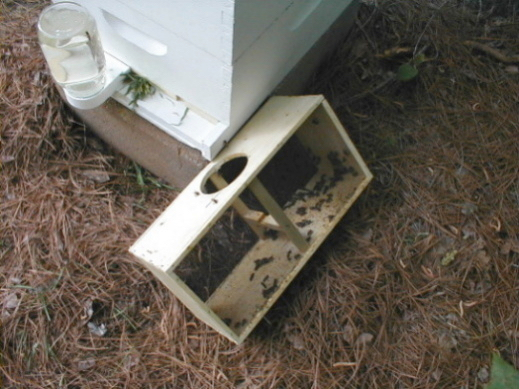
Alternative Method for Installing Bees
Here’s how the alternate method of installing package bees works:
You’ll follow the same steps as above up to the point of retrieving the queen cage. Once you have the queen cage ready to install in the hive, you’ll remove enough frames (usually 4) from one side of the hive body to allow the entire package to fit inside the hive.
If you’re not using a full-depth super, you might have to remove the same frames from two hive bodies to accommodate the package box.
Then place the queen cage between the 2 frames closest to the space created by the missing frames.
Put the package into that space with the top up, remove the cardboard over the feeder can hole (leave the feeder can out), and close up the hive.
No shaking or pouring required!
After a day or two, though, you’ll need to open the hive (with smoker going), remove the empty package box, and replace the frames.
Don’t do anything else.
Leave the queen cage undisturbed until 6 or 7 days after installing the bees.
The drawback to this method is that you have to disturb the bees so soon after hiving them to remove the package. And you might find that the bees have started to build some comb in some of the empty space left by the missing frames. If so, you’ll have to scrape that comb out.
But if you’re shaking a bit over the prospect of shaking bees a bunch, try this alternate method of installing package bees!